Introduction
Transferring herbs from a hydroponic system to a traditional soil environment can be a rewarding yet delicate process. This guide explains how to execute the transition while minimizing transplant shock, preserving root health, and encouraging rapid establishment. Readers will learn the scientific reasons behind each step, discover practical tools that simplify the work, and acquire best‑practice techniques that professional growers employ. By following the instructions, one will achieve thriving soil‑grown herbs that retain the flavor and vigor cultivated in hydroponics.
What You’ll Need
- Clean, well‑draining potting mix suitable for herbs (e.g., a blend of peat, perlite, and compost).
- Containers or pots with drainage holes.
- Watering can or gentle hose spray nozzle.
- Measuring cup or dropper for precise liquid dosing.
- Hormex Rooting Hormone Concentrate – a vitamin B1 enriched liquid stimulant that reduces transplant stress and accelerates root development.
- Gloves, soft brush, and clean scissors for handling delicate cuttings.
Step 1 – Prepare the Soil Environment
Begin by selecting a pot that matches the mature size of the herb. Fill the container with a high‑quality potting mix, leaving approximately two inches of space from the rim. The mix should retain moisture yet drain excess water quickly, preventing root rot. Lightly tamp the soil to eliminate air pockets, but avoid compacting it, as compacted soil restricts oxygen flow to the roots.
Optional: Incorporate a slow‑release organic fertilizer at a rate of one teaspoon per gallon of mix. This provides a balanced nutrient supply during the establishment phase, reducing the need for immediate supplemental feeding.
Step 2 – Hydrate the Hydroponic Herbs
Before removal, water the hydroponic system with a nutrient‑free solution for 24 hours. This practice flushes residual salts from the root zone, making the transition to soil less stressful. Use plain, room‑temperature water and ensure the solution reaches the entire root mass. After the flush, allow the system to drain completely so that the roots are moist but not saturated.
Hydrating the plants in this manner also prepares the roots for the upcoming hormone treatment, as a moist surface improves absorption of the liquid stimulant.
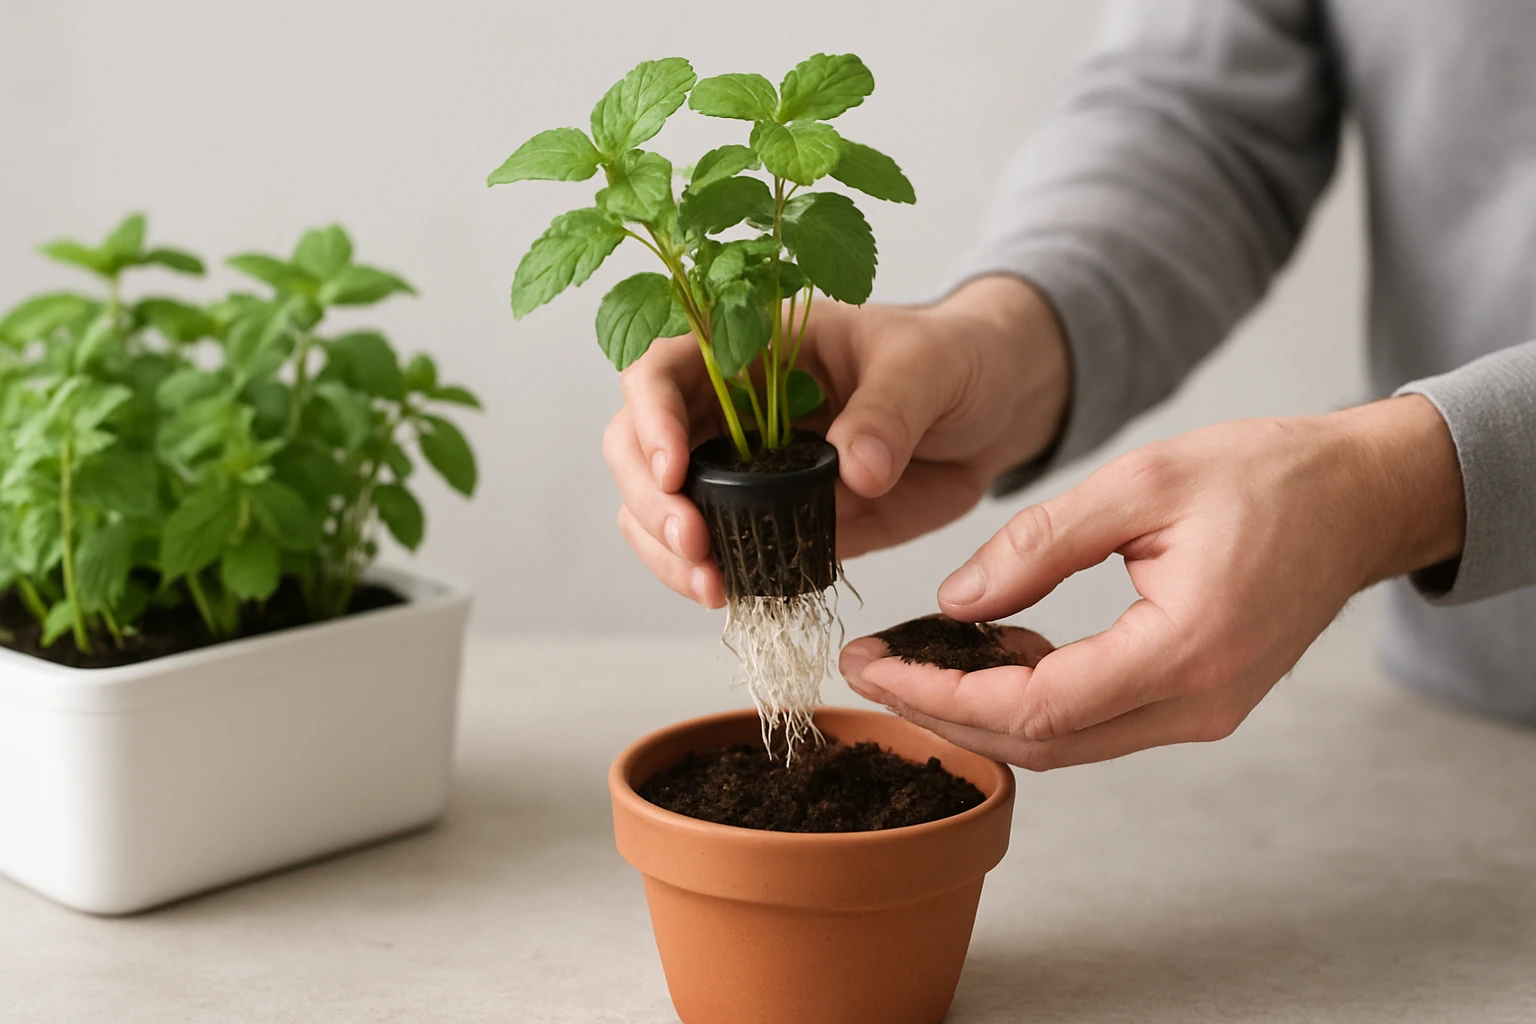
Step 3 – Remove the Herbs from the Hydroponic Setup
Gently loosen the growing medium surrounding the root ball. For net‑pot systems, lift the plant by supporting the stem near the base and slide the net out of the reservoir. For deep‑water culture, carefully lift the plant while keeping the roots submerged to avoid desiccation. Use soft brushes to remove any remaining growing medium without damaging fine root hairs.
Inspect the roots for signs of damage or disease. Trim away any blackened or mushy sections with clean scissors, cutting at a 45‑degree angle to promote clean healing. This step is crucial because damaged tissue can become a gateway for pathogens once the plant is placed in soil.
Step 4 – Apply Hormex Rooting Hormone Concentrate
Prepare a dilute solution of Hormex Rooting Hormone Concentrate by mixing one milliliter of the concentrate with one liter of water. The product contains vitamin B1, which strengthens cell walls and improves nutrient uptake during the critical establishment period. Its highly concentrated formula ensures that only a small volume is required, making it cost‑effective for repeated use.
Submerge the trimmed roots in the hormone solution for two to three minutes. This brief exposure allows the active ingredients to penetrate the root cortex, reducing transplant shock and encouraging rapid root elongation. After soaking, gently shake off excess liquid to prevent over‑watering when the plant is placed in the pot.
Why this product is advantageous: The hormone is liquid, eliminating the need for messy powders, and it is compatible with all growing media, including soil and hydroponic substrates. With a rating of 4.4 out of 5 stars from 2,487 reviewers and a price of $15.49, it offers a proven, affordable solution for both amateur and experienced growers.
Step 5 – Plant the Herb into Soil and Establish Care Routine
Create a small planting hole in the prepared potting mix, deep enough to accommodate the entire root ball without bending the roots. Position the herb so that the crown sits just above the soil surface, then backfill with the surrounding mix, firming gently with fingertips to eliminate voids. Water the plant thoroughly using a gentle spray until water drains from the bottom holes. This initial watering settles the soil around the roots and supplies the moisture needed for hormone activation.
Place the pot in a location that receives indirect sunlight for the first 48 hours. Direct intense light can increase transpiration, leading to dehydration of the newly transplanted roots. After two days, gradually increase light exposure to the herb’s usual requirements, typically six to eight hours of bright, indirect light per day.
Maintain a consistent watering schedule, allowing the top inch of soil to dry between waterings. Over‑watering can suffocate the roots, while under‑watering can negate the benefits of the hormone treatment. Monitor the plant for signs of wilting or leaf yellowing, adjusting water and light levels accordingly.
Tips & Pro Tips
- Label each pot with the herb variety and the date of transplantation. Accurate records help track progress and adjust care routines.
- Use a humidity dome or clear plastic cover for the first 24 hours to maintain a moist micro‑environment, which further reduces shock.
- Apply a thin layer of mulch (e.g., shredded leaves) around the base of the plant to conserve soil moisture and moderate temperature fluctuations.
- Consider a gentle foliar feed of diluted seaweed extract after two weeks to supply micronutrients that support vigorous leaf development.
- When transplanting multiple herbs, stagger the process by a few days. This prevents simultaneous stress on the growing area’s micro‑climate.
Troubleshooting
| Problem | Possible Cause | Solution |
|---|---|---|
| Leaves turning yellow | Over‑watering or nutrient deficiency | Allow soil surface to dry, then apply a balanced liquid fertilizer at half strength. |
| Wilting despite moist soil | Root damage or transplant shock | Increase humidity around the plant and ensure the hormone was applied correctly. |
| Stunted growth after two weeks | Insufficient light or compacted soil | Move the pot to a brighter location and gently loosen the top few centimeters of soil. |
Conclusion
Transplanting hydroponic herbs to soil requires careful preparation, gentle handling, and strategic use of growth‑enhancing tools. By following the five steps outlined above, one can minimize transplant shock, promote robust root development, and achieve healthy, flavorful herbs in a traditional garden setting. The integration of Hormex Rooting Hormone Concentrate provides an evidence‑based advantage, accelerating establishment and increasing long‑term plant vitality. Apply the tips and troubleshooting advice as needed, and enjoy the satisfaction of watching hydroponic herbs flourish in soil.
Products Mentioned in This Guide
Frequently Asked Questions
Why is transplant shock a concern when moving hydroponic herbs to soil?
Hydroponic roots are accustomed to constant moisture and can dry out quickly in soil, causing wilting and stunted growth.
How does a rooting hormone help during the transition?
Rooting hormone supplies vitamin B1 and auxins that stimulate root cell division, reducing stress and speeding up establishment.
What type of potting mix is best for hydroponic herbs?
A well‑draining blend of peat, perlite, and compost provides moisture retention while preventing waterlogging.
How should I water the herbs after planting in soil?
Water gently until the mix is moist but not soggy, then let the top inch dry before the next watering.
How long does it take for hydroponic herbs to adapt to soil?
Most herbs show new growth within 7‑14 days if kept in stable humidity and indirect light.