How to Convert a Closet into a Hydroponic Grow Box: Step-by-Step DIY Guide for Small-Space Indoor Gardening
Introduction
One will discover how to repurpose a standard closet into a controlled environment for hydroponic cultivation. The guide explains why a closet offers natural darkness, limited footprint, and easy access to utilities, making it an ideal starter grow box for urban dwellers. Readers will learn to select appropriate tools, install a misting hydroponic system, provide full‑spectrum lighting, and maintain optimal nutrient and water cycles. By following the instructions, one can produce fresh herbs, leafy greens, and small fruiting plants year‑round without requiring a dedicated greenhouse.
What You’ll Need
- Measuring tape, level, and basic hand tools (screwdriver, drill)
- Insulation panels or reflective foil
- Water‑proof liner or plastic sheeting
- Ventilation fan (optional for larger closets)
- Electrical outlet with surge protection
- Hydroponic system kit (see recommendation below)
- Full‑spectrum LED grow lights (see recommendations below)
- pH and EC meter, nutrient solution, and water reservoir
- Plant pods or grow sponges
Step 1: Assess the Closet Space
Measure the interior dimensions of the closet, noting width, depth, and height. One should record the maximum usable height after accounting for the door clearance and any shelving that will remain. Verify that an electrical outlet is within reach; if not, plan to run an extension cord rated for indoor use. This assessment determines whether the selected hydroponic kit will fit comfortably and whether additional height adjustments are required.
Step 2: Prepare Insulation and Light‑Proofing
Install insulation panels on the interior walls to minimize temperature fluctuations. Reflective foil can be applied over the insulation to improve light distribution when the grow lights are active. Seal any gaps around the door with weather‑stripping to prevent drafts. If the closet has a window, cover it with blackout fabric to maintain darkness during the light cycle. Proper insulation reduces heating costs and protects plant roots from cold shocks.
Step 3: Install the Hydroponic System
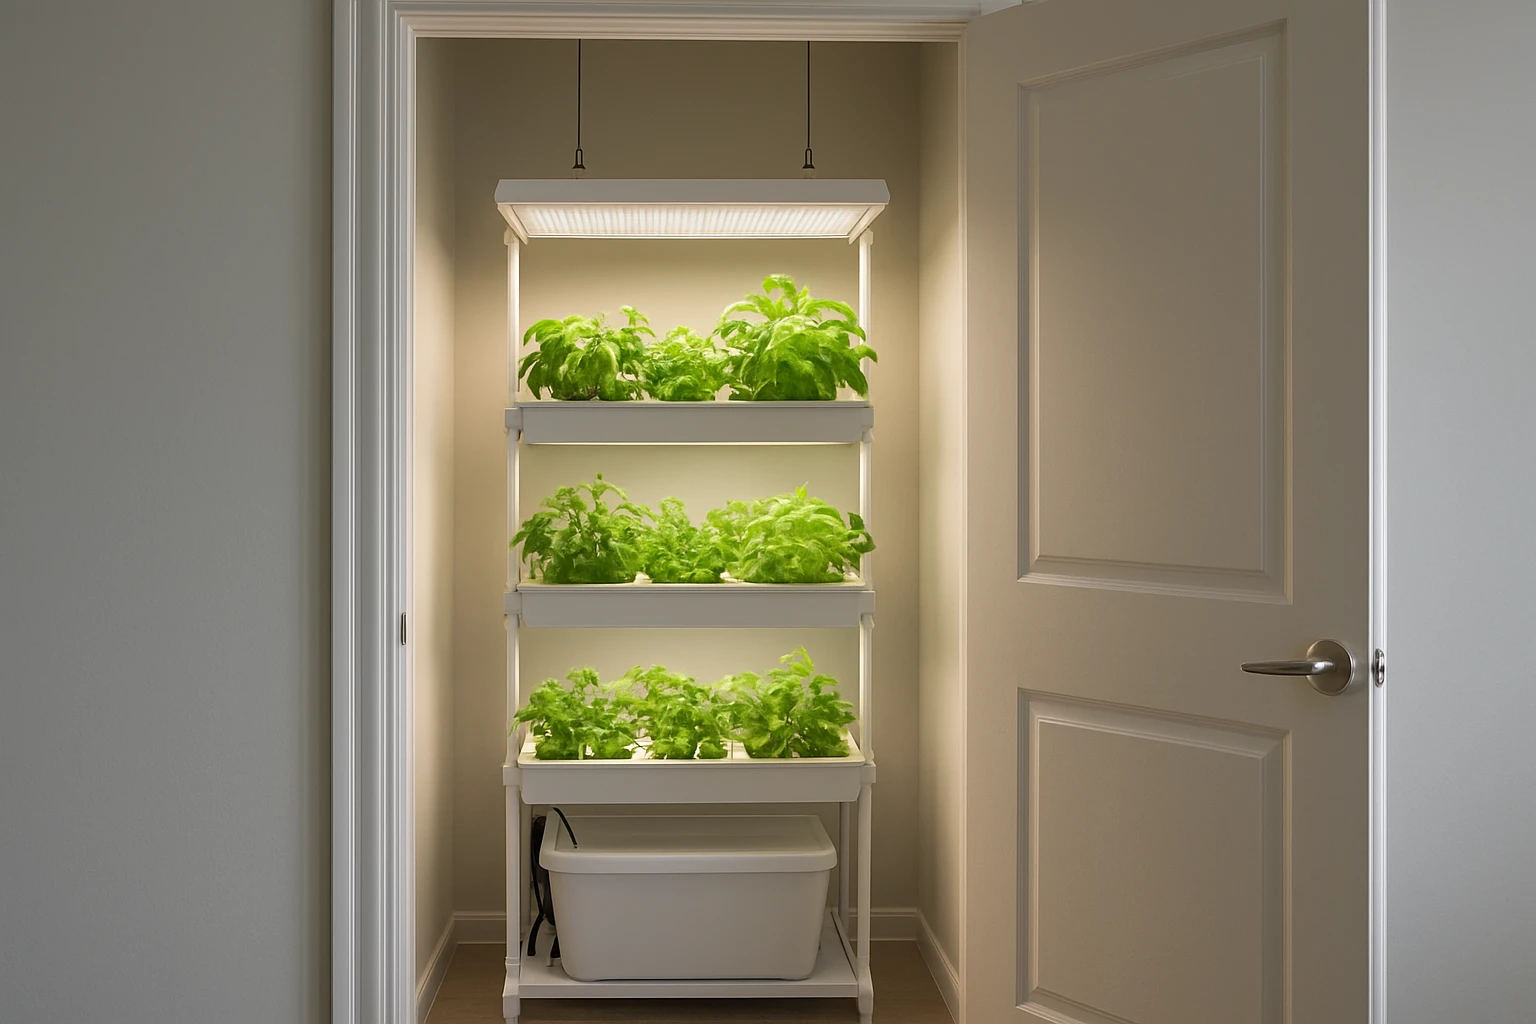
Place the Zekeson Hydroponic Garden Kit on the floor of the closet. The kit includes a 6 L tank, 15 misting pods, and an LCD touch panel for easy control. The advanced misting technology creates a moist, oxygen‑rich root zone that accelerates germination by up to 80 % and promotes stronger root development. Because the tank is large enough to hold three liters of water—the recommended level for most small‑space setups—one does not need to refill daily, which simplifies maintenance. Connect the power adapter to the nearest outlet and secure the tank with non‑slip pads to prevent movement during operation.
Adjust the height of each pod according to the plant species; the kit allows individual pod height modification, ensuring that taller herbs such as basil receive adequate space while low‑growth lettuce remains within the optimal misting range. The LCD touch panel provides real‑time monitoring of water level, misting schedule, and nutrient dosing, reducing the guesswork for beginners.
Step 4: Set Up Full‑Spectrum Lighting
Install the Barrina T5 LED Grow Light strips along the top interior of the closet. Each 1‑ft strip consumes 40 W and delivers the equivalent output of a 250 W traditional grow lamp, providing a high photosynthetic photon flux density (PPFD) while using minimal electricity. The black aluminum housing blends with the closet’s interior, and the magnetic mounting system allows quick repositioning without drilling. Attach the strips using the included clips and magnetic bar; the design permits daisy‑chaining up to sixteen lights, so one can expand the lighting array as the plant collection grows.
Configure the three light modes—Seedling, Vegetative, and Bloom—using the on‑off switch on each strip. For a mixed herb garden, set the lights to the Vegetative mode with a 14‑hour photoperiod, which balances growth speed and energy consumption. If additional localized intensity is required for fruiting plants, supplement with the LEOTER Adjustable LED Grow Light. This unit features a flexible gooseneck and ten dimmable levels, allowing precise targeting of high‑light‑demand zones such as tomato pods. Its built‑in timer further automates the light schedule, reducing manual intervention.
Step 5: Configure Water and Nutrient Delivery
Fill the Zekeson tank with filtered water and add the included A&B nutrient solution according to the manufacturer’s dosage chart. Use a calibrated pH meter to adjust the solution to a pH of 5.8–6.2, the optimal range for most hydroponic vegetables. The misting pumps will draw water from the reservoir and deliver a fine spray to each pod, ensuring uniform nutrient uptake. Because the system recirculates water, one should replace the solution every two weeks to prevent salt buildup.
Step 6: Add Growing Media and Plant Pods
Insert the provided grow sponges into each pod of the Zekeson kit. The sponges retain moisture while allowing ample oxygen flow to the roots, mimicking the natural soil environment without the mess of traditional media. Place pre‑soaked seed trays or individual seedlings into the sponges, spacing them according to the recommended plant height. For herbs such as mint or cilantro, use the full 15‑pod capacity; for larger fruiting varieties, occupy fewer pods and adjust the misting interval to prevent over‑watering.
Step 7: Test and Calibrate the System
Run the system for a 24‑hour trial before introducing valuable seedlings. Observe the misting cycle, verify that each pod receives an even spray, and check that the LCD panel accurately reports water level. Use the Barrina lights to simulate a full photoperiod and monitor plant response for signs of light stress, such as leaf bleaching. Adjust the light height or dimming level if leaves appear too pale. Record temperature and humidity readings; ideal conditions for leafy greens are 22–24 °C and 50–60 % relative humidity.
Step 8: Maintain and Harvest
Conduct weekly checks of water level, nutrient concentration, and pH. Refill the tank as needed and top up nutrients after each water change. Clean the misting nozzles monthly with a soft brush to prevent clogging. Harvest herbs by snipping the tops above the growth node, encouraging continuous regrowth. For fruiting plants, monitor pollination needs; a small fan can provide gentle airflow that mimics natural breezes and improves fruit set.
Tips & Pro Tips
- Install a small exhaust fan on the closet door to exchange air and prevent excess humidity buildup.
- Use reflective Mylar sheets on the back wall to maximize light utilization and reduce hot spots.
- Schedule the LED lights on a programmable timer to synchronize with the misting cycle, creating a consistent day‑night rhythm.
- Consider adding a portable dehumidifier if the closet tends to retain moisture after extended misting periods.
- Label each pod with the plant name and sowing date; the Zekeson kit includes pod labels for easy organization.
Troubleshooting
| Problem | Possible Cause | Solution |
|---|---|---|
| Leaves turning yellow | Insufficient nutrient concentration or excessive misting | Check EC meter, reduce misting interval, and replenish nutrients. |
| Stunted growth | Low light intensity or improper light spectrum | Increase LED distance or switch to Bloom mode; add supplemental LEOTER light. |
| Root rot | Water standing too long in the reservoir | Drain and clean tank, ensure proper aeration, and verify pump operation. |
Conclusion
One now possesses a fully functional hydroponic grow box within a modest closet, capable of producing fresh herbs and small vegetables throughout the year. The combination of the Zekeson misting system, Barrina full‑spectrum LED strips, and optional LEOTER adjustable light delivers a balanced environment that maximizes growth while minimizing manual effort. By following the step‑by‑step process, maintaining proper nutrient and light schedules, and applying the pro tips, any urban gardener can enjoy reliable harvests in a space that previously served only as storage.
Products Mentioned in This Guide
Frequently Asked Questions
What closet dimensions work best for a DIY hydroponic grow box?
A closet 3‑4 ft tall with at least 2 ft width and depth provides enough space for lighting, a water reservoir, and plant trays.
How can I waterproof the interior of a closet?
Line the walls and floor with heavy‑duty plastic sheeting or a waterproof liner, sealing seams with waterproof tape.
Which type of grow light is ideal for a closet setup?
Full‑spectrum LED panels deliver the needed light intensity while generating less heat, making them perfect for confined spaces.
Is ventilation necessary in a closet hydroponic system?
A small exhaust fan helps control temperature and humidity, especially for larger closets or when growing fruiting plants.
How frequently should I test pH and nutrient levels?
Check pH and EC daily for the first week, then at least 2–3 times per week to maintain optimal nutrient uptake.