How to Build the Best Hydroponic System: Step-by-Step Guide to Setup, Maintenance, and Maximum Yield
On February 1, 2026, this comprehensive how-to presents a professional, practical blueprint for constructing the best hydroponic system for both hobbyists and small commercial operators. The article balances design theory with actionable steps to ensure reliable setup, efficient maintenance, and measurable yield improvements.
Introduction: Why Choose the Best Hydroponic Approach
Hydroponic cultivation delivers faster growth cycles and higher yields per area than traditional soil methods when executed correctly. One seeking the best hydroponic system must weigh space, crop selection, budget, and management capacity before committing to a specific design.
This guide clarifies trade-offs, provides step-by-step instructions for common system types, and offers maintenance schedules to safeguard consistent performance and optimum yields.
Overview of Hydroponic System Types
Selecting the best hydroponic configuration requires understanding the most widely used systems and their respective advantages. The primary designs discussed here include Deep Water Culture, Nutrient Film Technique, Ebb and Flow, Aeroponics, and Wick systems.
Deep Water Culture (DWC)
DWC suspends plant roots in an oxygenated nutrient reservoir, promoting rapid growth and simple maintenance. DWC is well suited to leafy greens and herbs in small-scale indoor setups due to minimal plumbing and robust oxygenation requirements.
Pros include low complexity and strong yields for short-cycle crops. Cons include vulnerability to temperature fluctuations and disease spread in a shared reservoir.
Nutrient Film Technique (NFT)
NFT circulates a thin nutrient film past roots within sloped channels, delivering nutrients and oxygen efficiently with low water usage. NFT supports high-density plantings and is common in commercial basil and lettuce production.
Pros include excellent oxygenation and scalability. Cons include sensitivity to pump failures and channel blockages, which may stress shallow-rooted plants rapidly.
Ebb and Flow (Flood and Drain)
Ebb and flow periodically floods a tray with nutrient solution and then drains it, offering versatility for many crop types and grow media. The intermittent exposure supports oxygenation without continuous aeration equipment.
Pros include flexibility with media and plant types. Cons include higher mechanical complexity and the need for reliable timers and flood tables.
Aeroponics
Aeroponic systems mist nutrient solution onto exposed roots in a closed chamber, maximizing oxygen levels and accelerating growth rates. These systems are used in high-performance research and specialized commercial settings.
Pros include exceptional growth rates and water efficiency. Cons include high technical demands, sensitive calibrations, and greater capital and maintenance costs.
Wick Systems
Wick systems passively draw nutrients to the root zone via absorbent material and are suitable for beginners or low-maintenance applications. They are most appropriate for herbs and other small plants with modest nutrient demand.
Pros include simplicity and low cost. Cons include limited nutrient delivery capacity and unsuitability for heavy-feeding or large plants.
Design Considerations: Selecting the Best Hydroponic System for Objectives
Choosing the best hydroponic system begins with clear objectives: crop type, batch frequency, available footprint, and budget constraints. Each variable alters the ideal design and equipment specification in measurable ways.
One should account for initial capital, recurring nutrient costs, energy for lighting and pumps, and labor for maintenance when evaluating options.
Space and Layout
Analyze vertical versus horizontal footprint demands and potential for modular expansion. Vertical farming stacks can multiply yield per square meter but require robust lighting and climate control to maintain uniform conditions.
For a 2 m by 3 m indoor room, a single-layer NFT or DWC rack can support 40 to 60 lettuce plants, while vertical towers may increase capacity fourfold with additional LED cost and airflow considerations.
Crop Selection and Yield Targets
Short-cycle crops such as leafy greens, microgreens, and herbs typically deliver the fastest ROI for small hydroponic systems. Fruit-bearing crops like tomatoes and peppers require larger reservoirs and more stable nutrient management.
Set yield targets in kilogram per square meter per year and choose a system type and planting density to meet those metrics reliably.
Budget and Scalability
Budgeting should separate capital expenditure from operating expenditure. Capital includes tanks, pumps, lighting, and structure, while operating costs cover nutrients, energy, and labor.
Small hobby DWC setups may cost several hundred dollars to initiate, while a modular commercial NFT installation could exceed ten thousand dollars per growing bay inclusive of professional climate control.
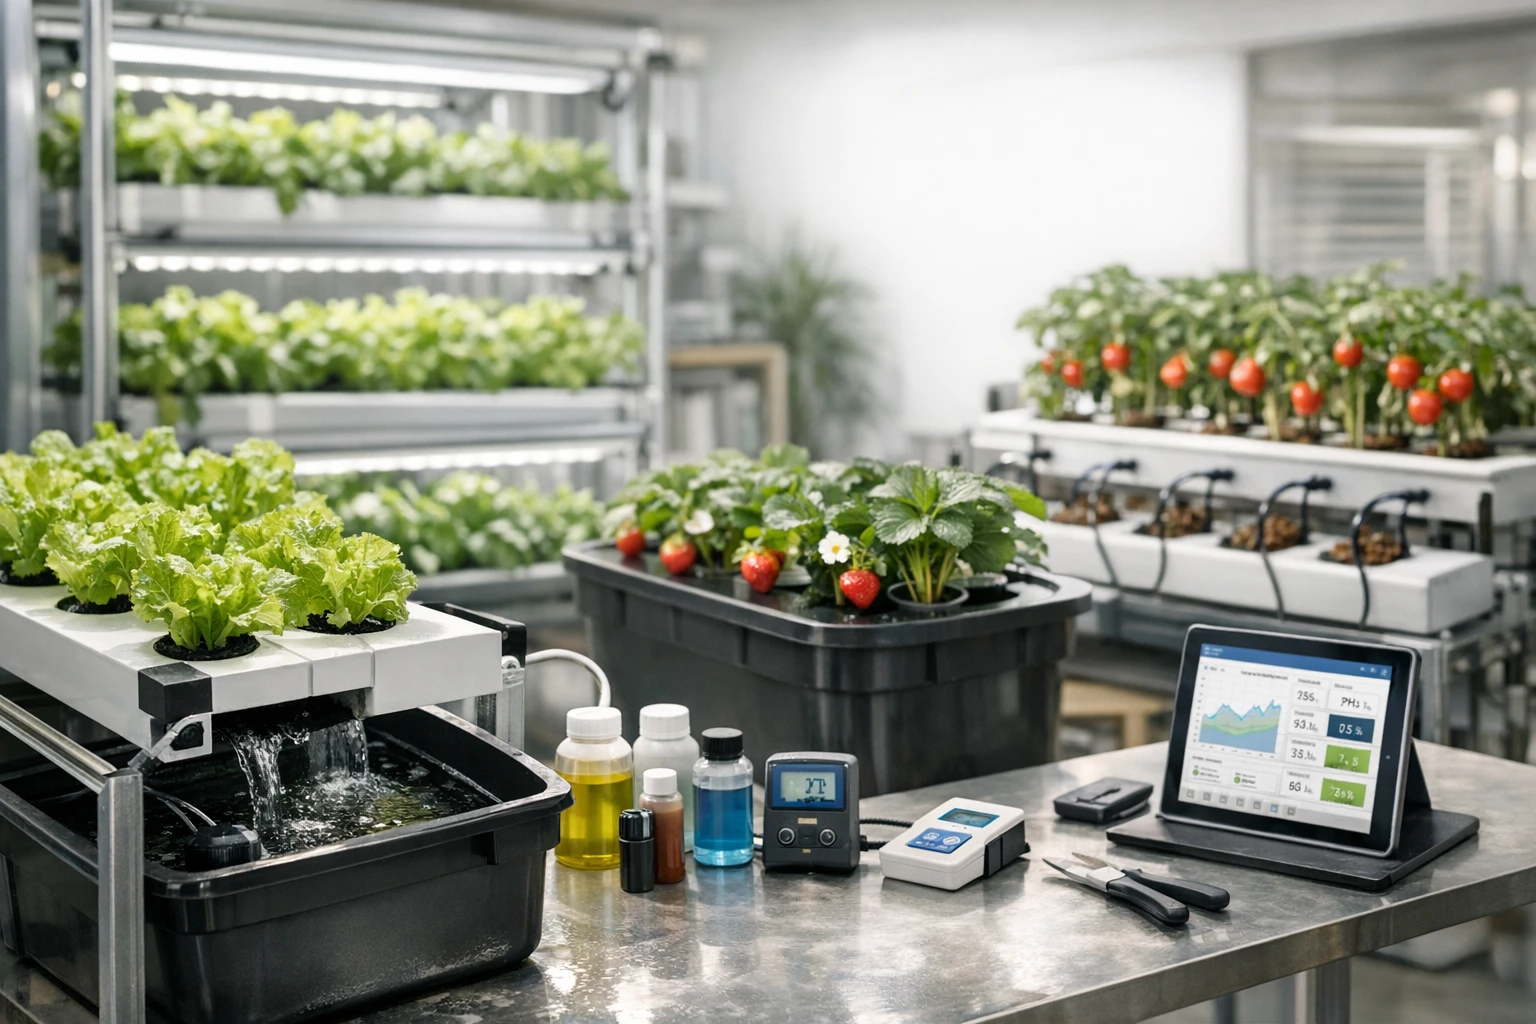
Step-by-Step Build: A Practical DWC Example for Beginners
The following step-by-step plan builds a reliable DWC unit suited to indoor home cultivation of lettuce and herbs. The process emphasizes simplicity while following best practices to achieve the best hydroponic results.
Materials and Tools
- Opaque 20 L reservoir with lid
- Air pump (200–400 L/h) and air stone
- Net pots and inert grow media (clay pebbles)
- pH and EC meter for monitoring nutrient solution
- Hydroponic nutrient solution formulated for leafy greens
- Seedlings or seeds and LED grow light (full-spectrum, adjustable)
- Thermometer and digital timer
- Optional: water chiller or heater for temperature control
Assembly and Setup
- Place the reservoir in a stable, level location protected from direct sunlight to reduce algae growth and thermal swings.
- Fit the net pots into the lid, spacing them per crop recommendations; for lettuce, allow 20 to 25 cm per plant.
- Install the air stone and connect the air pump. Ensure continuous oxygenation to avoid root hypoxia.
- Fill the reservoir with dechlorinated water and adjust temperature to 18–22°C for leafy greens.
- Add nutrients to reach an initial electrical conductivity (EC) of 1.2–1.6 mS/cm for lettuce, then adjust pH to 5.8–6.2.
- Place seedlings into net pots with inert media, ensuring roots reach the nutrient solution surface.
- Mount LED fixtures at recommended heights to deliver 100–200 µmol/m2/s PPFD for young lettuce, increasing as plants mature.
First 14 Days: Critical Monitoring
Monitor pH and EC daily for the first two weeks to ensure seedlings acclimate and nutrient uptake remains stable. Make small pH adjustments using pH up or down solutions to maintain the target range.
Top up water to maintain reservoir level and record any changes in EC to determine nutrient consumption rates for scheduling refills.
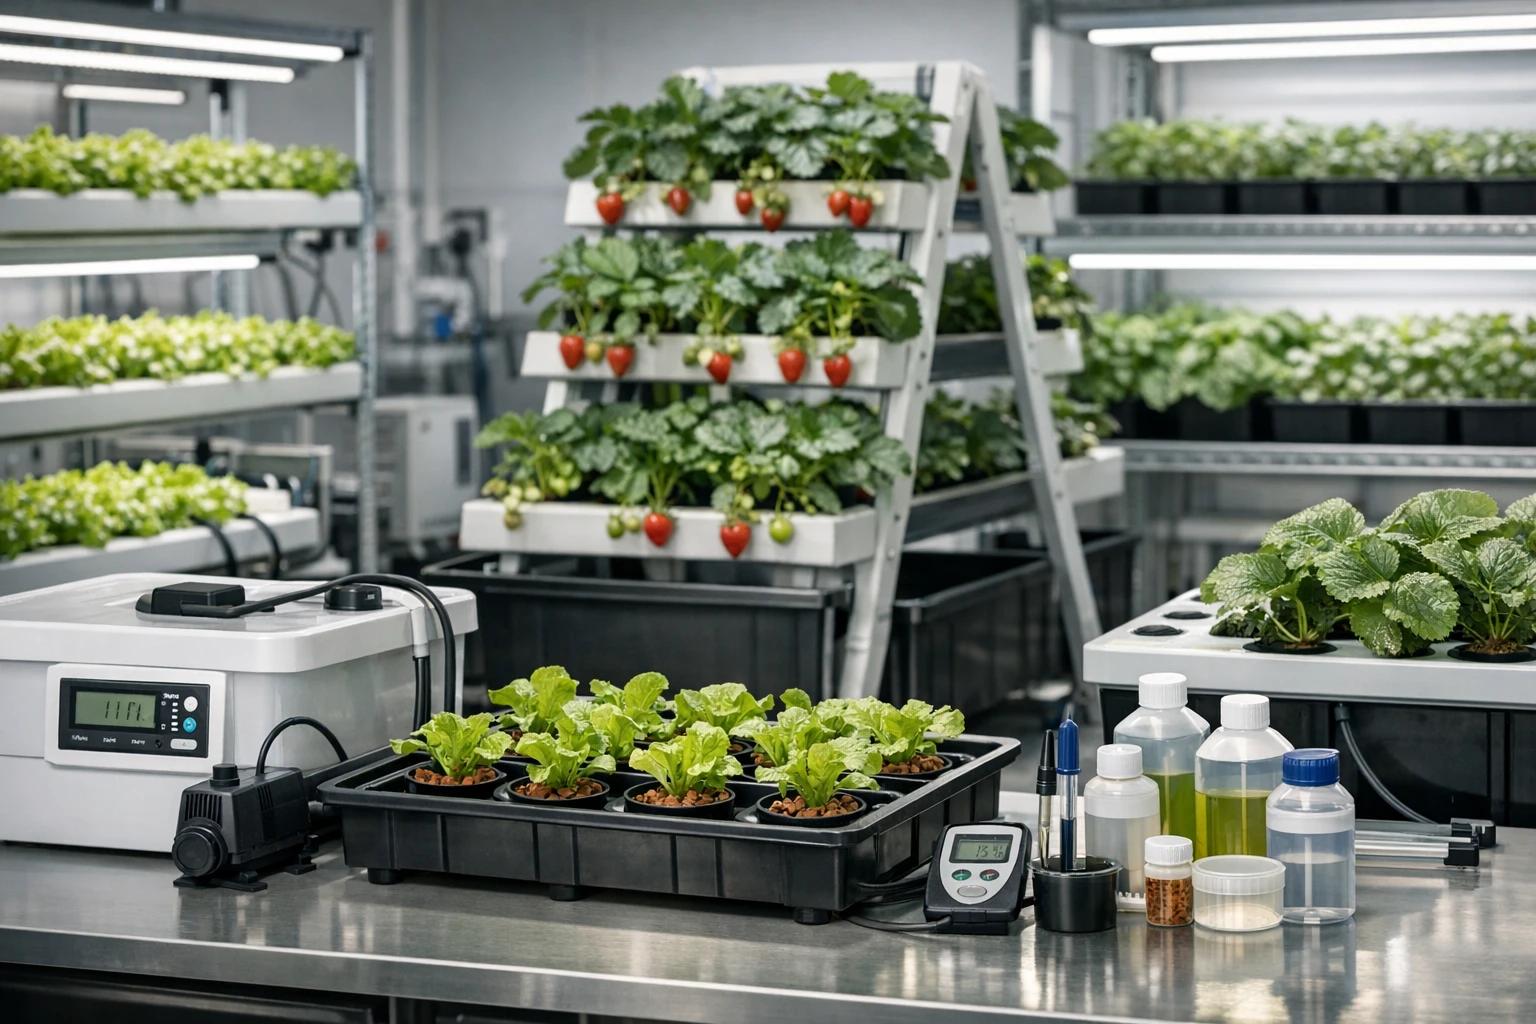
Step-by-Step Build: NFT System for High-Density Production
The Nutrient Film Technique supports continuous production lines and scales well for small commercial operations. The following steps produce a simple, reliable NFT lane suitable for lettuce and basil.
Materials and Tools
- 2–4 m of grow channel with slight slope (1–3%)
- Reservoir sized to system volume plus buffer (50–100 L)
- Submersible pump with flow rate sized to channel length (10–20 L/min per channel)
- Net pots, rockwool plugs, and end-cap filters
- pH and EC meters, timer for pump cycles where necessary
Assembly and Critical Tips
- Install the grow channel on a slight slope to ensure continuous nutrient film flow and avoid pooled zones.
- Use a header manifold to distribute flow along multiple channels uniformly and include shut-off valves for maintenance.
- Place an accessible drain and trap to enable quick system flushing and to remove sediments without disassembly.
One must schedule daily visual inspections and confirm flow continuity, particularly during early morning hours when pumps may start after a scheduled downtime.
Nutrient Management, pH and EC Targets
Nutritive control remains the single most influential factor in achieving the best hydroponic yields. Accurate monitoring and structured schedules reduce risk and improve consistency.
EC and pH Guidelines
- Leafy greens: EC 1.2–2.0 mS/cm, pH 5.8–6.2
- Herbs: EC 1.0–1.8 mS/cm, pH 5.5–6.5
- Tomatoes/peppers: EC 2.0–3.5 mS/cm, pH 5.5–6.0
Measure EC and pH daily at a consistent time and temperature to avoid variability. Replace nutrient solution every one to two weeks depending on reservoir size and crop uptake.
Nutrient Schedule Example for Lettuce (30-Day Cycle)
- Days 0–7: EC 1.2 mS/cm, maintain pH 5.8–6.0
- Days 8–21: EC 1.4–1.6 mS/cm, maintain pH 5.8–6.2
- Days 22–30: EC 1.6–1.8 mS/cm, maintain pH 5.8–6.2
Adjust nutrient strength gradually and observe plant response. Distinct crops require tailored macro and micronutrient blends for optimal flavor and tissue strength.
Lighting, Climate Control, and Environmental Management
Lighting intensity and spectral composition directly influence photosynthesis and morphology. Climate stability protects against disease and nutrient uptake irregularities.
Lighting Recommendations
For leafy greens, aim for 100 to 300 µmol/m2/s PPFD, with 14 to 18 hours of daily photoperiod depending on crop variety. Use full-spectrum LEDs to reduce heat load and increase energy efficiency.
For fruiting crops, increase PPFD to 400–800 µmol/m2/s and adopt staging cycles that match flowering and fruit set requirements.
Temperature and Humidity Targets
- Day temperature: 20–24°C for leafy greens
- Night temperature: 16–18°C for consistent respiration rates
- Relative humidity: 50–70% to balance transpiration and disease risk
Maintain consistent airflow with fans and filtered intake to stabilize CO2 levels and prevent stagnation in dense plantings.
Maintenance Checklists and Troubleshooting
Routine maintenance preserves system longevity and crop health. A clear checklist simplifies labor planning and prevents avoidable failures.
Daily Tasks
- Inspect pumps, air stones, and emitters for blockages.
- Check pH and EC and record values in a logbook or digital tracker.
- Visual inspection of plant health and early pest signs.
Weekly Tasks
- Top up nutrient solution and adjust concentration as needed.
- Clean screens, filters, and surface biofilm.
- Prune and harvest to maintain airflow and light penetration.
Troubleshooting Common Problems
Yellowing lower leaves often indicate nutrient deficiency or pH drift. Confirm pH and EC before applying corrective nutrient amendments.
Root rot appears as brown, slimy roots and a foul odor, commonly due to low dissolved oxygen or high temperatures. Address immediately by improving aeration and replacing solution.
Case Studies and Real-World Applications
Two concise case studies illustrate outcomes of applying best hydroponic practices at different scales.
Case Study 1: Urban Apartment DWC — Lettuce
A metropolitan hobbyist used a 20 L DWC reservoir with a single LED fixture and achieved a 30-day crop cycle for butterhead lettuce. By maintaining EC at 1.4 mS/cm and pH at 6.0, they averaged 4.5 kg of harvestable lettuce per month from a 0.6 m2 footprint.
The low capital outlay and weekly one-hour maintenance rendered the setup both practical and economical for urban residents seeking fresh produce year-round.
Case Study 2: Small Commercial NFT — Basil Production
A three-channel NFT rack in a 20 m2 greenhouse produced 120 kg of basil per month with continuous planting and 16-hour LED photoperiods. Stringent monitoring of flow rates and nutrient composition reduced crop losses to under 2% per cycle.
Operational efficiencies, including automated dosing and simple water heating, produced a return on investment within 14 months for the operator due to high-quality, premium-priced basil sales to local restaurants.
Comparisons, Pros and Cons Summary
Selecting the best hydroponic system requires balancing risk, capital, and management intensity. The following summary assists in comparative decision making.
Quick Comparison
- DWC: Low cost, easy setup, good for beginners; watch oxygenation and temperature.
- NFT: High density and scalability; requires reliable pumps and maintenance.
- Ebb and Flow: Versatile across crops; needs dependable timers and spill containment.
- Aeroponics: Maximum growth rates; demands precise maintenance and higher costs.
- Wick: Ultra-simple; not suited for high-demand crops or large plants.
Conclusion: Achieving the Best Hydroponic Results
Constructing the best hydroponic system demands thoughtful selection of system type, meticulous environmental control, and disciplined nutrient management. Careful planning reduces risk and maximizes both crop quality and yield per area.
One seeking reliable outcomes should begin with a modest DWC or small NFT lane, document all measurements, and iterate system parameters based on recorded plant responses. Over time, incremental improvements in lighting, automation, and nutrient strategies will compound into significant productivity gains and economic returns.